The good thing about DVD technology compare to VCD and VHS is that it allows user to browse a movie scene by scene from a Menu list. For example you want to skip a particular scene because you might think the movie is a little bit boring and you want to be on the climax, you can just go to the root menu and find the scene you want. Also, DVD movie now, comes with special feature like behind the scene and the making of the movie clips aside the movie itself. All those items can find on the root menu list of the DVD movie.
Windows 7® got this new feature which allows user to create menu list from their raw video footage as I mentioned above. There are dozens of video editing software in the market today, but for this purpose we can just use the built in application from Windows 7® package. Aside from the software that burns the movie, we can also add titles; credits and even scene selection out from scratch just using the easy and new Windows DVD Maker ®and feel the professional looking way.
This tutorial will basically teach you to create the menu list and burn your movie in a DVD style and you will be amazed how wonderful this application is. I assume that you have a raw video in hand because you’ll use of course later in this tutorial, any video will do, any format but right now I am using the sample movie I just saw in Windows 7® video folder. I am sure you’ll also have this, the title of the movie clip is “Wildlife” and it’s up to you if you are going to use it for the sake of this tutorial. And last, make sure you have a blank recordable DVD so you can publish your movie right after your editing. So let’s get started.
- Make sure you’re using Windows 7® OS right now in any version because Windows DVD Maker® comes only with all Windows 7® versions. First, open the Windows DVD Maker ®application from your program menu. If you can’t find it just type Windows DVD Maker ®on the search box and Viola!
- The picture above is the default window of this application; basically we can see nothing on it so go to the “Add items” as highlighted and browse the movie you want. Just I mentioned that I’ll be using the sample movie I find and I hope this time you have one already. Note: You can choose more than 1 clip. The default location is E: drive so no worry because it will prompt you at the end of the editing where you can save it. The default DVD title is the current date but you can edit it on the customization button later. So if you’re done choosing your video just click “Next”.
- You’ll see this window and showing options for creating cool presentation. Above the menu, you can anytime preview what you have done. On the right side, there are 20 menu styles; you can choose on what type of menu presentation you want. Now, let’s edit the menu text to be appeared on the menu list. The Image below shows what’s inside this option.
- As I previously mentioned you can change the DVD title anytime, so with this tutorial I put Sample Videos as the title. You can also enter any credits in the notes button, like date and venue of a birthday celebration. And the rest I leave it all by default.
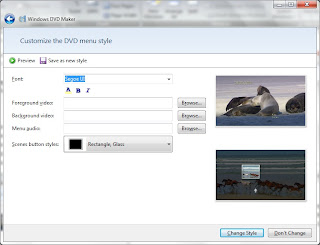
- On the customization menu, you can put videos or picture as foreground and putting background music will also add the whole DVD movie feeling and you’re done. If you’re going to use this style you can save it so the next time you don’t have to do it again from scratch, you can just choose it from the menu style list. After playing around what’s best for your movie or video presentation you can now ready burn the file to your recordable DVD and publish it. The DVD burn time takes 10-30 minutes depending on the length of your movie.
So you’re done the menu list editing to look and feel its like done in professional way that only took you less than an hour. You can share now your party DVD videos with your friends without hesitation that it looks dull. You can use this tutorial in the making of your wedding, birthday or Christmas video footage.


Home building designs, & Intercad programs?
ReplyDeleteThank you for sharing this very useful content.
ReplyDeleteWindows DVD Maker
Thank you for sharing. Currently I'm using Leawo DVD Copy and it is so far so good. Because it can help me remove region code on my DVDs.
ReplyDelete